Image Map

What is flexible seating??

Hey Blog Hoppers! I am Kim and I blog at The Kindergals. Buzz words come and go so when I heard "Flexible Seating" I did a little digging. What did I find out? It really isn't anything new! Flexible Seating has been around A LONG TIME! Recently it has been given a lot of attention on blogs, Instagram and other social media platforms. It makes my teacher heart happy to see so many teacher embracing this concept! It's a concept that I embraced many years ago. 

Here's my "flexible seating" journey...

When I began teaching kindergarten...it was REALLY kindergarten. We ate snack, we took a nap, we had recess twice a day, we learned our letters, we played in centers, we finger painted...and we didn't have an assigned seat! It was the way I learned to operate a classroom, it was the way my mentors taught me to teach. The children moved around the room into different areas sometimes at a table, sometimes on the floor, sometimes on a couch, sometimes in a bathtub. The classroom was a place where learning didn't require a desk with a name plate for each child.

Times changed and we have slowly moved to a kindergarten where children learn to read, add, and subtract.When Common Core came out, many teachers gave up the things that had worked for them as they turned their focus to the standards. They moved to more seat assigned work, more directed instruction, more "sit and get" type learning--"sit there and I hope you get it". Teachers moved to more of a "print and go", reproducible, no prep type of instruction where the standards where written on the paper so it must be the best way to teach. 

Thankfully many teachers are now seeing that flexible seating doesn't mean you have a "loosey goosey" classroom where the teacher loses control. Instead, they see it is a place where rigor is evident in every lesson. It is a classroom with very specific routines and procedures. It is within this structure that children can be more selective as to where and how they learn. It allows for differentiated instruction, multiple intelligences, and Bloom's taxonomy to all occur not as separate lessons, but as the way the learning is delivered on a daily basis.  In today's classroom, the instruction might be a little different. The standards might be a bit more rigorous.  But the way children learn best hasn't changed!

What does flexible seating look like? It can look different in each teacher's room. Here are a few pictures of what it looks like in our classrooms. The true goal of seating it to maximize instruction.  Flexible seating is different kinds of seating for different kinds of instruction.

Flexible seating doesn't mean that you have a "tableless" room. 

As a matter of fact, I love my small group table. This is a table I use to meet with a small group of kids while the other children are working around the room. My kids know that this is the spot where we are going to meet together! It is also my desk! I don't have a teacher desk. This is it.


If I am doing a messy craft that involves paint....I would never want to do that on the carpet. I like to use my table for crafts, painting, cooking...things you would use a table for if you were at home! I also have a few small tables around the room. Here are a few that I have used over the years.


Sometimes I do my activity on the floor. Talk about excitement! Crazy, right? Just because we did our shaving cream writing on the floor they were super excited. Why did I do it? I wanted them sitting in a row instead of around a table. I wanted to be sure they were all seeing the word left to right! That is what flexible seating is REALLY about. After we decide what standard we are going to teach, we think about what resources we are going to use, which materials are going to be the most successful in helping our children achieve mastery. But, another decision that needs to be made, what seating environment while be most conducive.


Where's "Their" Spot?

My kids do have an assigned spot on the floor. To be honest, this is for my own sanity. I like for them to know where to get on the rug. This keeps kids apart that I just don't want together. It keeps all the kids in the right spot so that the instruction is most impactful.  It makes it where I can establish share partnerships with intention.


See those red bags? That is one of the smartest things I ever did as a teacher. It is their "carpet bag". This is where they keep all of the supplies that we use for large group instruction.  In the morning they get them out of the baskets and place them on their carpet spot. They stay there all day! You can read more about the carpet bags here. This eliminates the need for that desk to hold all those supplies! ALL, every single minute, of large group instruction is done with the kids sitting on the rug. They use a lap board for supporting their paper as needed.  With all the kids right there, I can easily see who is getting it and who needs to spend a little more time with me. It keeps the pace moving quickly as there is no need for me to walk around all those crowded tables. 

Why Did I Get Rid of Tables In the First Place?


To be honest, getting rid of my tables had nothing to do with any research! There, I admit it. Most of my decisions as a teacher are based on that "gut" feeling. That feeling that there has to be a better way. (It's only after I try things that I later find research to say it's a good idea!) I wanted to have the cute rugs, fun benches--the cozy places for kids to breathe! The problem--there wasn't enough room for the tables and the things I wanted! We hardly used our tables. So, one day after school I pushed a table to the workroom and put my name on it--in case I wanted it back! The next day, I pushed a second table. As you can guess, I never looked back. I kept two tables, one for me and one in case another adult was in my room doing a messy, fun activity with the kids! The rest of the room slowly filled with pillows, benches, clip boards, lamps, end tables, etc.

The Classroom is Your Day House

Now, my parents always ask at Open House where their child's desk is.  Here's how I explain it...School is our Day House. On Saturdays when I am home, I don't sit at my kitchen table all day...I would go stir crazy. Instead I move around my house--laying on the couch, sitting at the table, crawling around on the floor with the kids, swinging on the porch...different kinds of seating for different kinds of activities.

Pattern VS Novelty

We also know that the brain learns by pattern, but seeks novelty. So we divide our rooms into 5 zones. Each zone has different types of seating, different literacy centers, different math centers, different types of writing tools, etc. The kids visit one zone each day. The fact that they know the rotation, 1 zone each day of the week, establishes that pattern that the brain loves. But, the variety of resources and the different environment provide the novelty that the brain seeks.Within the zone they sit where they want! It depends on what they chose to do as to where they chose to sit...

...on their belly, leaning against the couch or using the storage unit as a table top! As long as they are working, getting the job done, being productive, working as a team, problem solving, then I'm good--sit where you like!

So that's it! Simple as that! Not a decision I made based on a research paper I read. Not a decision I made because it was the cool thing to do. It was a decision I made because I wanted to create an environment that was warm and cozy. A place where kids don't have anxiety. A place that I love to spend my Sunday afternoons.  A place where parents stick their head in the door and say "this is so cool".  A place where an academically rigorous curriculum doesn't cause tummy aches.



Easy Peasy Interactive Word Walls


Hey Peeps - Traci from Dragonflies in First Here! Today I am sharing an idea I posted a couple years ago over on my site about Easy Peasy 
INTERACTIVE WORD WALLS.
I had had a love-hate relationship with word walls for a very long time. I've always believed they were important, but faced a few word wall obstacles that made them a bit tough.

But after years of trials and changes - I have a system that works and I LOVE it!

Here's a run down on how I side-step those obstacles.


After trying a variety of locations, I discovered the best place is one that is easy for me to reach, easy for the kids to reach and easily seen. 

I use my cabinet doors.
Word wall letter labels shown here from Classroom Essentials Bundle. Sight word cards shown here from Homework Time.

I have found the best way to stick things to walls and cabinets (other than my beloved business card magnets - THOSE are amazing!) is the fabulous blue Fun-Tak! 


It sticks great AND allows things to be easily moved and removed. It hasn't left any residue on any of the surfaces I've used it on. I use it to stick up posters and cards to my walls, cabinets and even my white boards. It is reusable, so when I remove it from the back of something, I save it in a ball stuck inside my desk drawer for quick access. It isn't sticky or gummy. I seriously LOVE this stuff! You only need a little and those cards stay in place ALL YEAR!


Keeping ALL of the words we discuss/learn/assign (be it sight, high-frequency, or vocabulary) on the word wall all year lessens it's effectiveness.

After several weeks, I take down a few of the words I believe the kids have probably mastered.

We have a little spelling "test". I let the kiddos know that this is just for me and I won't be grading it. I have them number a paper that I have folded to make numbering with adequate space between columns easy for them. Then I ask them to spell the words I've taken off the wall.


Generally, most of the kids get them all right. But I do note the ones that are missed and who missed them. If the same word has been misspelled by more than 3 out of my 30 students I leave the word on the wall. Otherwise, I work with those kiddos to help them master the word and leave it off the wall.


"Checking in" periodically and removing words off the wall helps keep the chaos off the space and makes it easier for the kiddos to find the words they need. The word TAKE was an issue for 3 of my kiddos on this one, so the four of us had another little lesson on silent e.  ;)

Also, doing this cuts down on the time it takes to do some of our word wall interacting activities.


Each morning we practice our words. One of the students has the job of "pointer". That kiddo grabs the pointer from the cabinet, then points to the words as the rest of the class reads them. It's the pointer's job to go VERY fast and it's the kiddos job to keep up. They love the race. 

After they do all the words as a class, the pointer selects a student to read the words on their own. During this time, the class offers support as needed.


A child's stick is selected from the "blank" cup. If they read the words with no more than 2 errors, their stick is moved to the "Passed" cup. If not, it just goes back so they have an opportunity to be chosen again. This is a quick way for me to assess who has it and who doesn't.

The kiddos also LOVE to "read the wall" during independent word work. They are permitted to take turns pointing to the words. The only rule is that they must not use the name sticks during this time.


Each week I expose my kids to 9 more words to learn. Some are strictly sight words (can't be sounded out, don't follow the rules) and others are high-frequency words (introduced in order of frequency and often phonetic in nature). These words are part of their homework, and 4 of them are also part of their weekly spelling.

We practice these words in our core curriculum during the same time as well as our Morning Wake-Up and Daily Literacy Practice - basically everything that is part of our daily routine. After that week of introduction, the words are added to the word wall. The kids remember having learned them, so when they are searching for how to spell them, the wall serves as a perfect spelling dictionary.

So there you have it - a useful, forever changing word wall. Like I said, easy-peasy!

I hope this helps if you also struggle with a love-hate relationship with word walls. Moreover, I hope it helps to bring some simplicity into your teacher life!

Stop over and visit me at Dragonflies in First for more organization and simplification tips!


Bear Math Centers & Printables


Hi Everyone! This is Kacey from Doodle Bugs Teaching!

Bears are one of my favorite units to teach! Kids love learning about the different kinds of bears and the science facts. And, we ALL love the cuteness of a teddy bear! 

I used to teach a bear unit in January because it was a great time to talk about Polar Bears.
 But, one year I moved my bear unit to April. It fits in a little better with my schedule. 
{Not that I am against a January Bear Unit too! HA!}

I wanted to share an old product that I have updated and doubled in size recently. 

So, we are slap in the middle of a fun bear unit now in my classroom. And, these math centers are part of our weekly center rotations,
We started the centers last week and they will flow over into this week too.
There are 12 different center options in my Bear Math Centers unit so there was plenty for me to choose from.
Here is a little glimpse of the math centers included...
And, also included are 15 print and go math printables. That are just perfect for morning work, early finishers or homework. Or, anywhere else you want to squeeze them in.
If you are interested in seeing more you can click the link below.


Weather Writing Crafts and Resources

Hello Friends,

This is Cindy from Kinderkay Love Those Kinders. In kindergarten, we work on weather concepts all year, but I really LOVE concentrating on weather in the spring for many reasons... One reason is that I live in Central Illinois and we can get every kind of weather you can think of in the spring! One day it is 70 degrees and two days later, we are wearing our winter coats. It's also a great time to observe clouds because they are always changing, too! When we begin talking about weather, we look at real photos of weather, take a walk outside to look for clouds and weather related changes like branches blown off trees, footprints in the mud, and buds growing on bushes and flower stems. Because my kinders are so much more independent and able to write in the spring, it is the perfect time to do a few cute writing activities that are related to weather AND..... it covers both a literacy goal and a science goal! A win-win!


After we do a few nature walks, I like to have my kiddos create a "Weather Field Guide". I show them different types of guides (They know that a field guide is a non-fiction book that gives information) and they do this short half-sized Weather booklet. It includes types of weather as well as types of clouds.


After they create their field guide, we use it to take another nature walk. We look at the clouds and decide what kind of weather we are seeing.
https://www.teacherspayteachers.com/Product/What-is-Weather-Lets-Make-a-Book-For-Little-Kids-798279

I read several weather books to them and we discuss the types of weather found in each book. We also discuss what we can do in different types of weather.

This is also the time of year when we talk about nouns and the words that describe them - adjectives. Describing weather is a perfect way to learn about adjectives. Here is our list... It's not perfect, but a pretty good first attempt!

By this time, they are ready to write about weather. They draw a picture of their favorite kind of weather and what they enjoy doing in that weather. Then they write a few sentences about it. It was easier for them to equate weather to the seasons, so most of them wrote about their favorite season; which was fine with me. If you would like this writing activity, click HERE.
If you receive a message asking for permission to share this resource, you are probably trying to do it at your school and your network is blocking the download. The settings for this resource are set for PUBLIC. Try downloading at home (or away from school) and I'm sure that you will have success!

https://drive.google.com/file/d/0B1ubUzeAYMczQzI0cmEzakttd2c/view?usp=sharing

After they do their writing, they are ready to create their weather kid. The first thing they do is trace a person shape upon white paper and use crayons to color their face and hair. (I have them use crayons to color their faces because I do not like the look of painted faces. That's just me, though!)  After their face is colored, they use paints to create the clothes that they would wear in that particular type of weather.


Most of my kiddos chose sunny, summer weather as their favorite....


but there were a few spring, fall, and winter fans.....

So.... that's just a few activities that you can do if you are studying weather. There are TONS of links and activities that you can do to make your weather study a STEM project. This is simply a fun way to reinforce or introduce your present weather unit. If you are interested in creating my weather field guide, you can find it by clicking the image below....

https://www.teacherspayteachers.com/Product/What-is-Weather-Lets-Make-a-Book-For-Little-Kids-798279


https://www.teacherspayteachers.com/Product/What-is-Weather-Lets-Make-a-Book-For-Little-Kids-798279

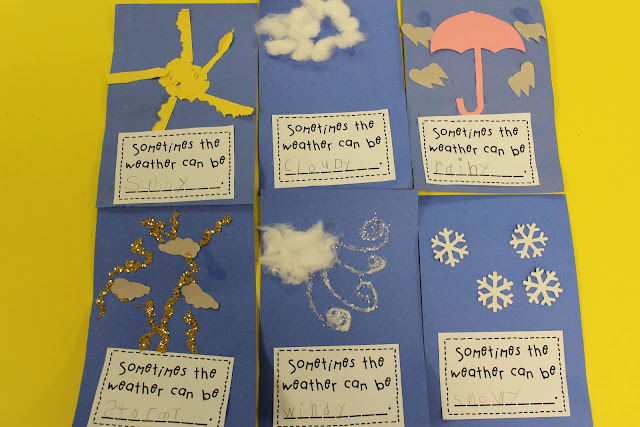
Julie, from Mrs. Lee's Kindergarten has some really cute weather ideas on her blog... Here are a few photos. To go to her blog, click the images... I love these little meteorologists!

http://mrsleeskinderkids.blogspot.com/2014/02/weather-activities-centers.html


http://mrsleeskinderkids.blogspot.com/2014/02/weather-activities-centers.html


https://www.teacherspayteachers.com/Product/Weather-Crafts-Writing-1084930

If you are looking for resources for a little older child, Rachel, from The Tattooed Teacher, has an awesome close reading, comprehension and foldable one.....

https://www.teacherspayteachers.com/Product/Weather-leveled-Close-reads-passages-questions-interactive-notebook-foldables-1127449

 So, that's it for now, my friends.... Happy Spring!

Until next time...